Create a ClusterIssuer for Let’s Encrypt with an ISRG Root X1 trust chain.
This article is for people who want to create a Let’s Encrypt certificate with an issuer or want to create an ingress load balancer with an…

Photo by Matteo Grando on Unsplash
This article is for people who want to create a Let’s Encrypt certificate with an issuer or want to create an ingress load balancer with an SSL certificate matching their domain. Or this article is also solving the outlined issue below.
Problem:
Android sometimes has issues regarding a “DST Root CA X3” trusted chain. Possible errors are below:
Error 1:
[0] {System.Net.Http.HttpRequestException: The SSL connection could not be established, see inner exception. — -> System.Security.Authentication.AuthenticationException: Authentication failed, see inner exception. — -> Mono.Btls.MonoBtlsException: Ssl error:1000007…}
Error 2:
An immediate fix on the server side is to force the ISRG Root X1. e.g. with Certbot certbot renew — force-renewal — preferred-chain “ISRG Root X1”
Error 3:
Update the trust chain for the SSL certificates on the server you’re attempting to talk to (immediate fix)
Solution:
We have to start at the beginning and create a new SSL issuer, which prefers using the ISRG Root X1 trust chain and not the “DST Root CA X3”.
$ cat <<EOF > test-issuer.yaml
apiVersion: cert-manager.io/v1alpha2
kind: ClusterIssuer
metadata:
  name: letsencrypt-prod-android-sup
spec:
  acme:
    email: "example@gmail.com"
    server: https://acme-v02.api.letsencrypt.org/directory
    preferredChain: "ISRG Root X1"
    privateKeySecretRef:
      name: account-private-key-android-ssl
    solvers:
      - selector: {}
        http01:
          ingress:
            class: nginx
EOF
Important here is the part of the preferredChain. When we have the file test-issuer.yaml created. We can apply it with:
$ kubectl apply -f test-issuer.yaml
This should solving the error which we outlined before.Now you can use the issuer to create a certificate with a ISRG Root X1 trust chain.
$ cat <<EOF > test-certificate.yaml
apiVersion: cert-manager.io/v1alpha2
kind: Certificate
metadata:
 namespace: default
 name: hello-certs4
spec:
 secretName: account-private-key
 issuerRef:
 name: letsencrypt-prod-android-sup
 kind: ClusterIssuer
 dnsNames:
 — servicete.example.com
EOF
And apply the yaml again:
$ kubectl apply -f test-certificate.yaml
You will need to wait at least 2–5min until the cert-manager can create the resources and the certificate is ready. The status you can check with:
$ kubectl describe certificate hello-certs4
In the end it should look like this:
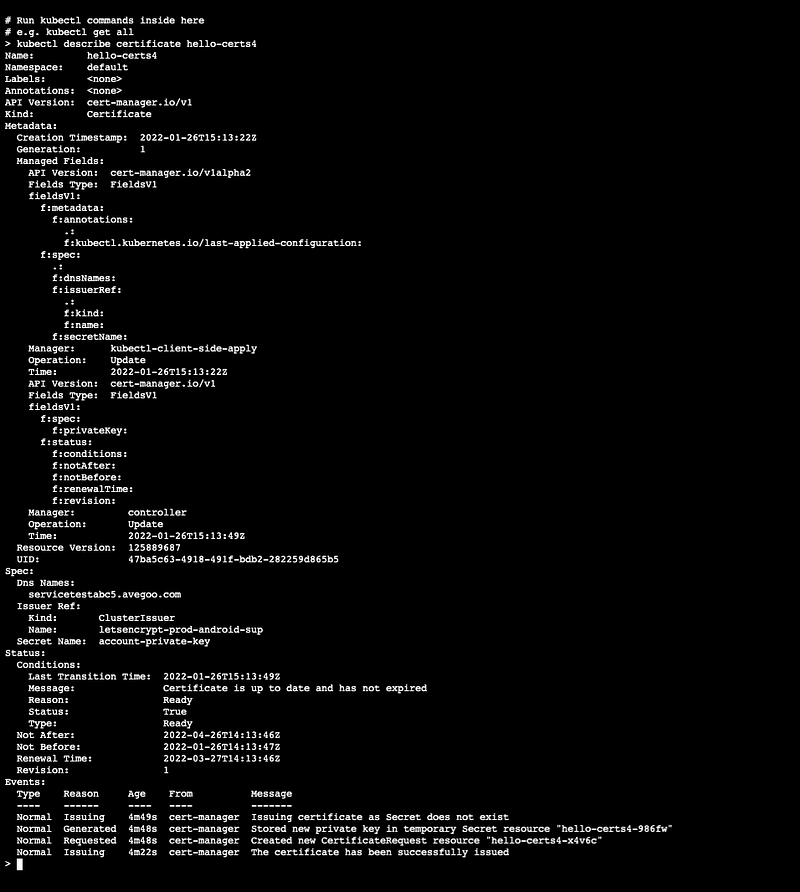
This is it. Now you should be able to issue certificates with the cluster issuer “letsencrypt-prod-android-sup”. An example of issuing a ingress load balancer could look like this:
apiVersion: extensions/v1beta1
kind: Ingress
metadata:
 name: expose-portal-user
 annotations:
 kubernetes.io/ingress.class: “nginx”
 cert-manager.io/cluster-issuer: “letsencrypt-prod-android-sup”
 kubernetes.io/tls-acme: “true”
spec:
 tls:
 — hosts:
 — api.avegoo.com
 secretName: ingress-cert-gateway-api-exposure
 rules:
 — host: api.example.com
 http:
 paths:
 — path: /
 backend:
 serviceName: gateway
 servicePort: 3000
Here the value of the annotation “cert-manager.io/cluster-issuer” should match the cluster issuer we created in the beginning. This means “letsencrypt-prod-android-sup”.Here the value of the annotation “cert-manager.io/cluster-issuer” should match the cluster issuer we created in the beginning. This means “letsencrypt-prod-android-sup”.
Publicly checking SSL Certification trusted chain
Of this open the website https://www.ssllabs.com/ssltest/index.html and enter the desired URL.
Troubleshooting for the certificate issuing
For debugging you can also use:
$ kubectl get orders
$ kubectl get orders
$ kubectl describe order 82935-hello-certs4-order
I hope the article helped. Happy coding.